
Back to Blog
Best practices

How to Write a Test Case (Step-By-Step Guide With Examples) 

Learn how to write test cases with this comprehensive guide. Follow our 7 steps to structure your tests, define outcomes, and catch software defects early.

Armish Shah
November 22, 2025
September 4, 2026
How to Write a Test Case (Step-By-Step Guide With Examples) 

Best practices

How to Write a Test Case (Step-By-Step Guide With Examples) 

by:

Armish Shah

September 4, 2026

8

min

Share:

How to Write a Test Case (Step-By-Step Guide With Examples)  | TestFiesta
On this page

Ready to take your testing to
the next level?

Sleek and intuitive workflows
Transparent pricing
Easy migration

Introduction

Every great software release starts with great testing, and that begins with well-written test cases. Clear, structured test cases help QA teams validate functionality, catch bugs early, and keep the entire testing process focused and reliable. But writing great test cases takes more than just listing steps; it’s about creating documentation that’s easy to understand, consistent, and aligned with your testing goals. This guide will walk you through the exact steps to write a test case, with practical examples and proven techniques used by QA professionals to improve test coverage and overall software quality.

What Is a Test Case in Software Testing?

A test case is a documented set of conditions, steps, inputs, and expected results used to check that a specific feature or function in a software application works as it should.

In software testing, test cases form the backbone of every QA process. They help teams ensure complete coverage of each feature, stay organized, and maintain consistency across different releases. Without structured test cases, it becomes easy to miss defects or waste time retesting the same functionality.

In agile environments, where products evolve quickly and new builds roll out frequently, having clear and reusable test cases is a way to assess quality quickly before release. Test cases allow software testers to validate updates with proven confidence and help QA teams maintain stability even as new features are introduced.

There are two ways you can create and conduct test cases:

Manual Test Cases

Manual test cases are created and executed by testers who manually follow each step and record the results. Manual testing is ideal for exploratory scenarios, usability assessments, and cases that rely on human judgment.

Automated Test Cases

Automated test cases are created using automation frameworks that automatically execute predefined test steps without needing manual input. Automation speeds up repetitive and regression testing, providing faster feedback and greater consistency. In most modern QA teams, both manual and automated test cases work together, balancing accuracy with efficiency to create high-quality, reliable products.

Why Writing Good Test Cases Matters

Writing good test cases comes down to clarity. When a test case is easy to read, anyone on the QA team can pick it up and know exactly what to do. It removes the confusion, keeps things consistent, and makes sure no key scenario gets missed.

Clear documentation also saves time in the long run. Teams can find bugs earlier, avoid repeating the same work, and stay focused on making sure the product works the way it should.

But when test cases are unclear, the whole process slows down. People interpret steps differently, things get missed, and problems show up later in production when they’re far more expensive to fix.

Essential Components of a Test Case

A well-structured test case includes several key elements that make it easy to understand, execute, and track. These components include:

  • Test Case ID: Each test case should have a unique identifier. This will help the QA team to organize, reference, and track test cases, especially when dealing with large test suites. 
  • Test Title: A good test title is short, descriptive, and makes it easy to see what the test is designed to verify.
  • Test Description: The description highlights the main goal of the test case. It explains which part of the software is being checked and gives a quick understanding of what the test aims to achieve.
  • Preconditions: Preconditions are conditions that must be met before the test can be executed. This may include setup steps, user permissions, or system states that ensure accurate results.
  • Test Steps: Test steps are a clear, step-by-step list of actions that testers need to follow to execute the test. Each step should be logical, sequential, and easy to understand to prevent confusion.
  • Expected Result: The expected result defines what should occur once the test steps are followed. It helps testers verify that the feature performs the way it’s meant to.
  • Actual Result: Actual result is the real outcome observed after running a test. Testers compare this with the expected result to determine if the test passes or fails.
  • Priority & Severity: Priority indicates how urgently a defect needs to be fixed, while severity describes how much the defect affects the system’s functionality.
  • Environment / Data: The environment and data used to run the test keep the results consistent and repeatable every time the test is executed.
  • Status (Pass/Fail): Reflects the outcome of the test. A Pass confirms that the feature worked as expected, while a Fail highlights an error that requires attention.

A Practical Framework for Writing Effective Test Cases

The goal of a test case is to provide a straightforward, reliable guide that anyone from the QA team can use. Here’s a simple, structured process to help you write effective test cases that improve software quality and testing efficiency.

1. Review the Test Requirements

Every strong test case starts with a clear understanding of what needs to be tested. Begin by thoroughly reviewing the project requirements and user stories to understand the expected functionality. Identify the main goals, expected behavior, and any acceptance criteria that define success for that feature. 

At this stage, it’s important to think beyond what’s written. Consider how real users might interact with the feature and what could go wrong. Ask questions, clarify uncertainties, and make notes of possible edge cases, which are unusual or extreme scenarios, like entering very large numbers, leaving required fields blank, losing internet mid-action, or clicking a button multiple times, that help testers catch issues beyond the normal flow.

The better you understand the requirement, the easier it becomes to create focused, meaningful test cases that actually validate the right functionality.

2. Identify the Test Scenarios

After reviewing the requirements, the next step is to outline the main scenarios that describe how the user will interact with the feature. A test scenario gives a bird’s eye view of what needs to be tested; it’s the story behind your test cases.

Think of a test scenario as a specific situation you need to test to make sure a feature works properly. For example, if you’re testing a login page, one scenario could be a user logging in successfully with the correct credentials. Another could be a user entering the wrong password, or trying to log in with an account that’s been deactivated.

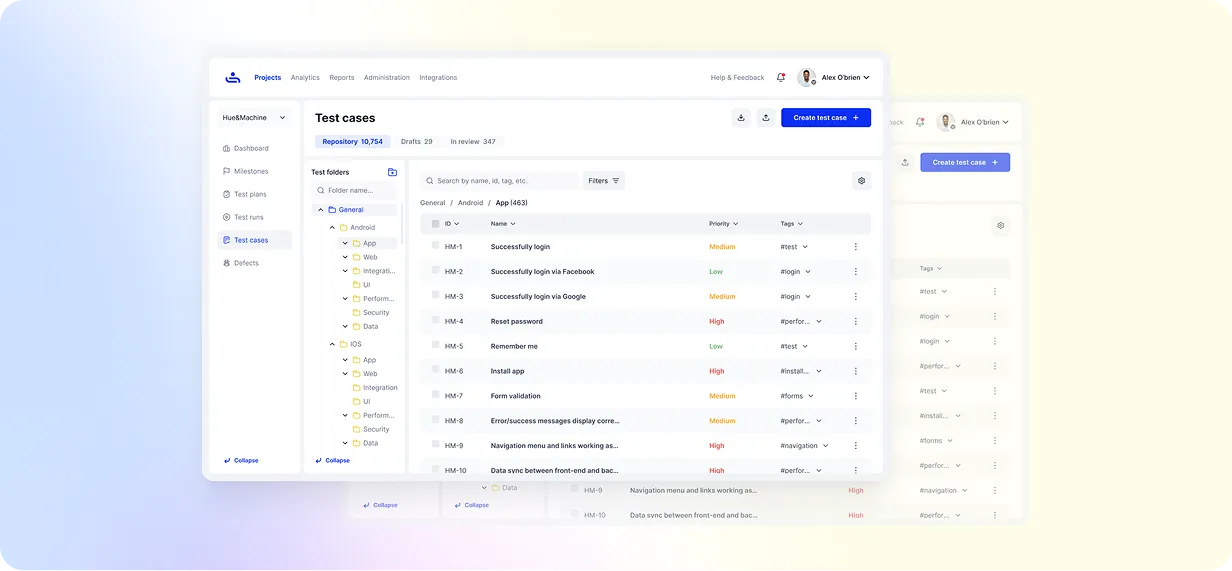
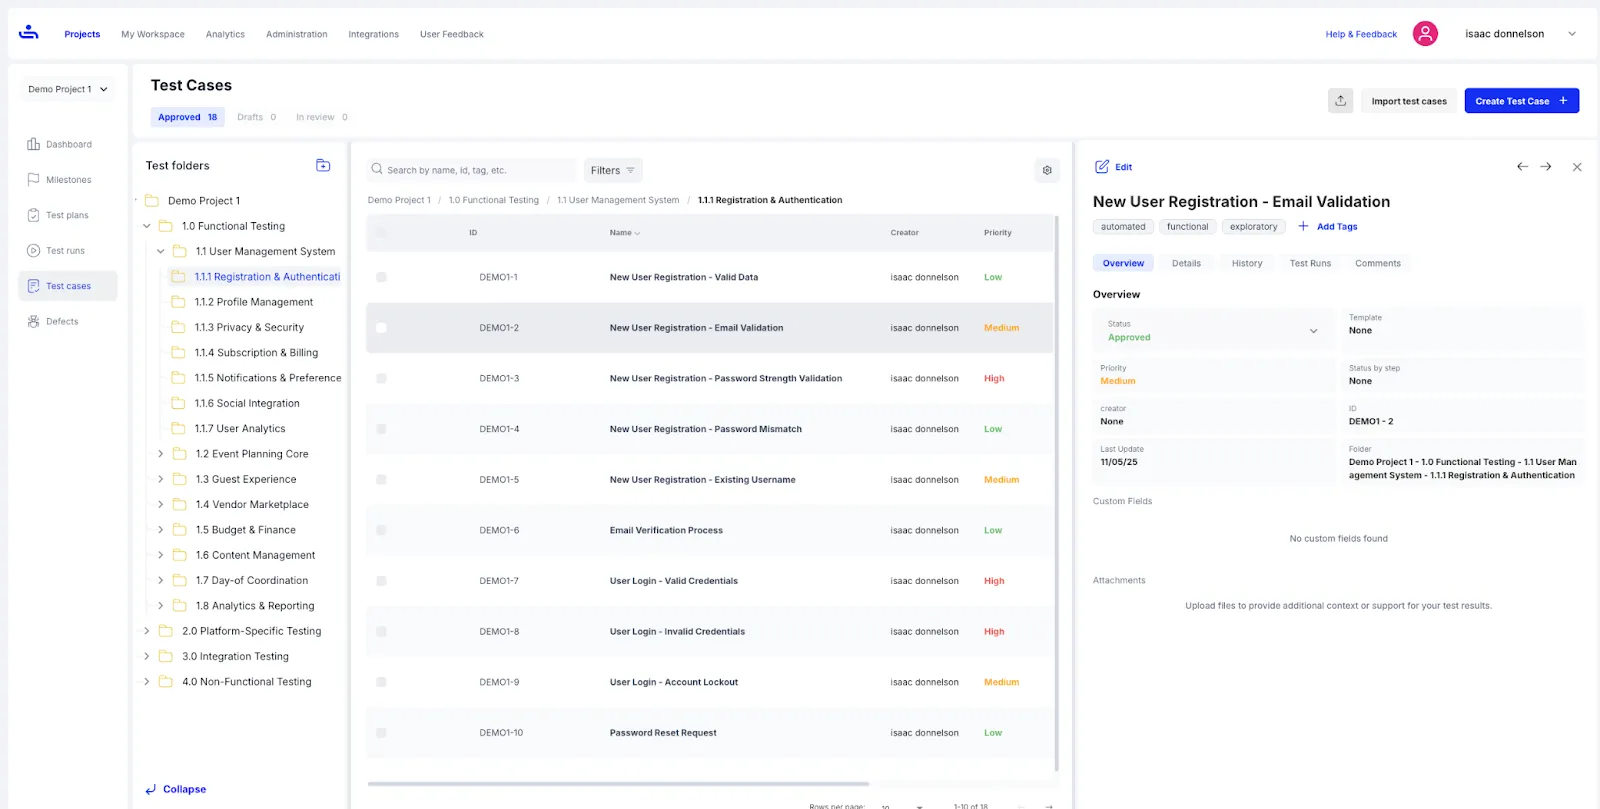
 A window showing written test cases in TestFiesta projects.

The image above shows how test cases are organized inside a project in TestFiesta, with folders on the left, a detailed list of cases in the center, and the selected test case opened on the right for quick review and editing.

3. Break Each Scenario into Smaller Test Cases

Once you’ve defined your main test scenarios, the next step is to break each one into smaller, focused test cases. Each test case should cover a specific condition, input, or variation of that scenario. Breaking test scenarios into cases confirms that you’re not just testing the “happy path,” but also checking how the system behaves in less common or error-prone situations.

4. Define Clear Preconditions and Test Data

Before you start testing, make sure everything needed for execution is properly set up. List any required conditions, configurations, or data that must be in place so the test runs smoothly. This preparation avoids unnecessary errors and keeps the results consistent. Documenting preconditions and test data also makes it easier to rerun tests in different environments without losing accuracy.

5. Write Detailed Test Steps and Expected Outcomes

After setting up your test environment, list the actions a tester should take to complete the test, step by step. Each step should be short, specific, and written in the exact order it needs to be performed. This makes your test case easy to follow, and anyone on the team can execute it correctly, even without a lot of prior context. Next, define the expected result, either for each step or as a single final outcome, depending on how your team structures test cases. This shows what should happen if the feature is working properly and serves as a clear reference when comparing actual outcomes. 

6. Review Test Cases with Peers or QA Leads

Before finalizing your test cases, have them reviewed by another QA engineer or team lead. A second pair of eyes can catch missing steps, unclear instructions, or redundant cases that you might have overlooked. It’s important to maintain consistency across the QA team with regard to standards and the structure of a test, and peer-reviewing is a great way to do that. It gives you broader test coverage and a more unified approach among team members.

7. Maintain and Update Test Cases Regularly

Test cases aren’t meant to be written once and forgotten. As software evolves with new features, design updates, or bug fixes, your test cases need to evolve too. Regularly review and update your test documentation to keep it relevant and aligned with the latest product versions. 

How to Write a Test Case (Step-by-Step Example in TestFiesta)

To make the process concrete, let’s walk through a real example of creating a test case in TestFiesta. This step-by-step example shows how each field is used and when to fill it, so you can follow the same flow when writing your own test cases.

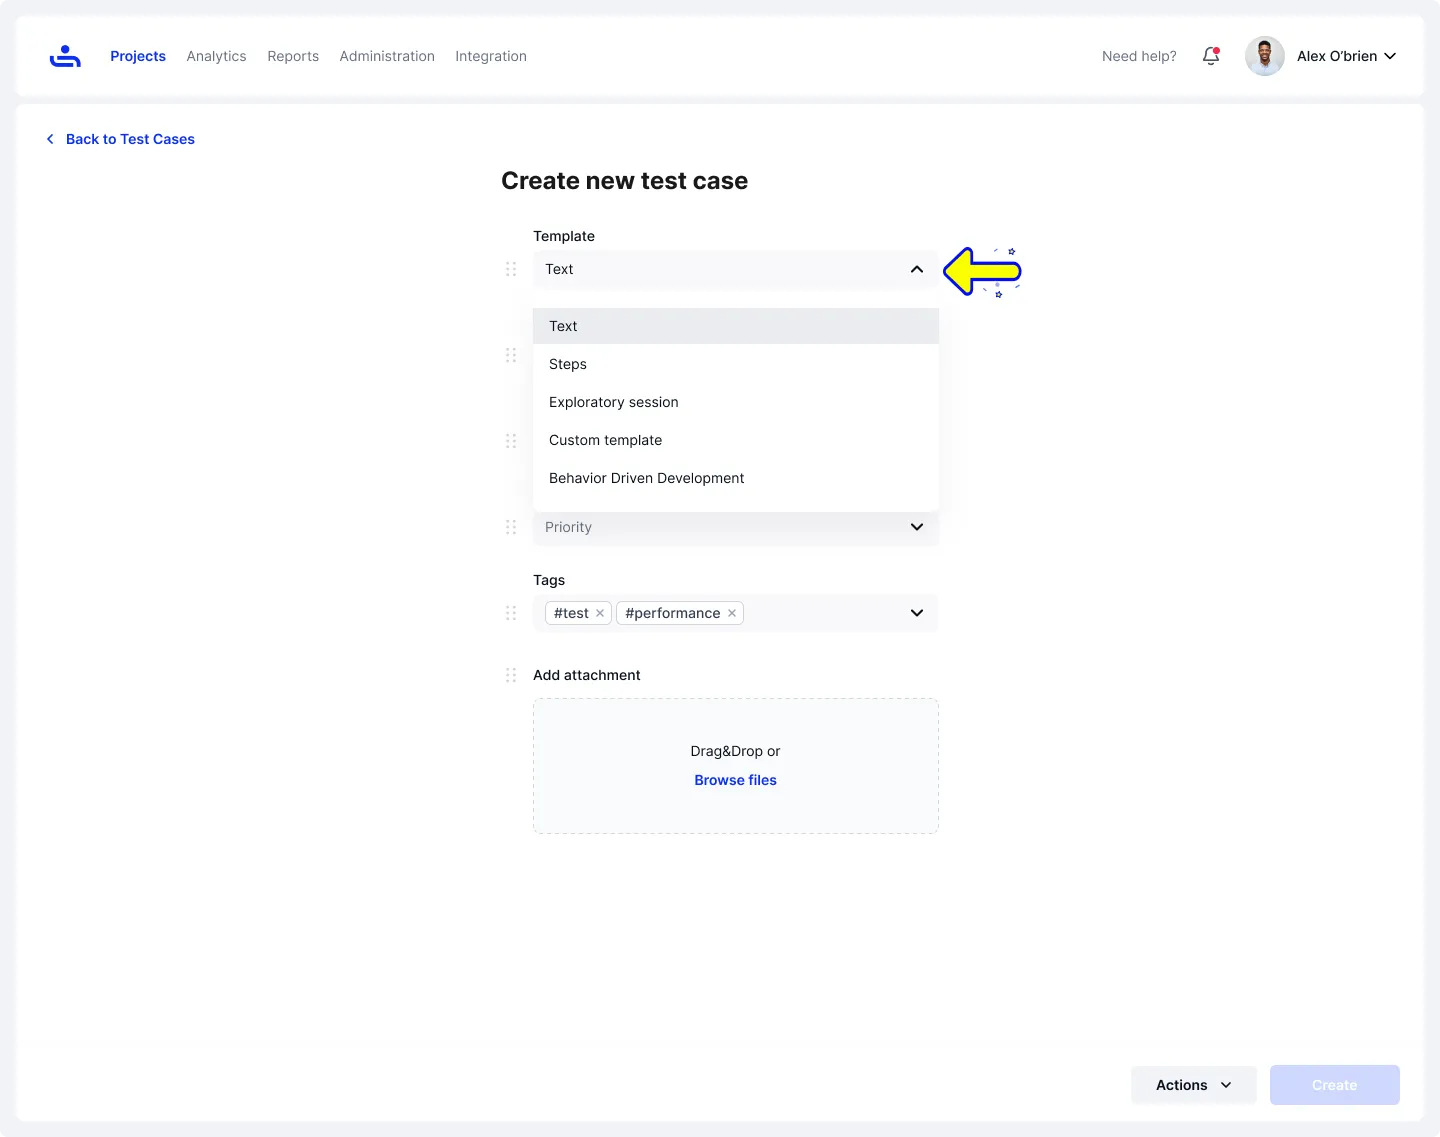
A dialogue box showing the process of creating a new test case in TestFiesta.

Step 1: Start a New Test Case and Choose a Template

In the first step, you choose a template to start with. Templates are pre-built test case formats that give you a ready-made structure, so you don’t have to start from scratch.

Using a template helps keep test cases consistent across the team and saves time, especially when you’re creating many tests for similar features. Choose a template that matches the type of testing you’re doing

Once the template is selected, you can fill in the details, name, folder, priority, tags, and any attachments. Attachments can include screenshots, design mockups, API contracts, sample data files, or requirement documents that give testers the context they need to run the test accurately.

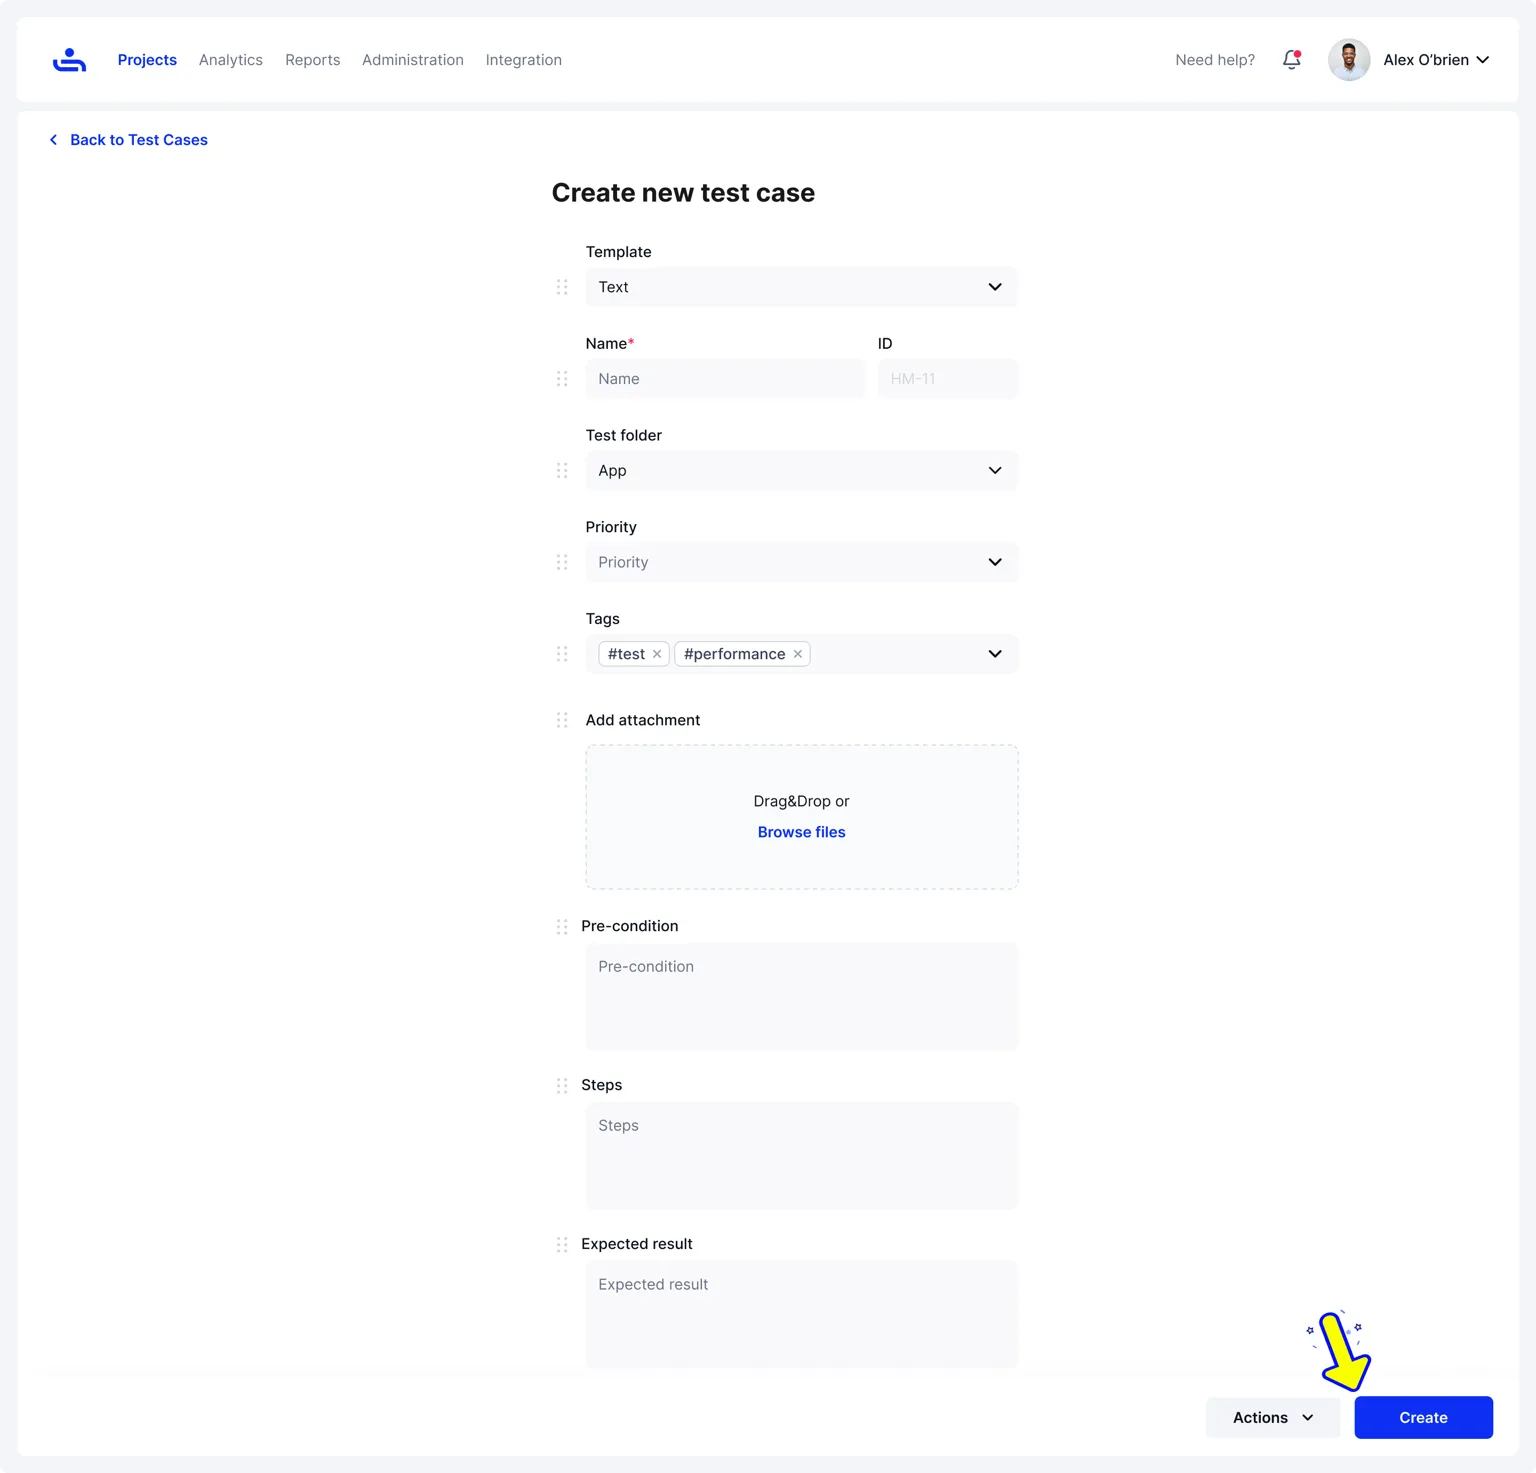
A dialogue box showing the process of creating a new test case in TestFiesta.

Step 2: Fill in Basic Test Case Information

Once the template is selected, you’ll enter the basic details that help organize and identify the test case:

  • Test case name: Use a clear, descriptive name that explains what’s being tested.
  • Folder or location: Choose where the test case should live so it’s easy to find later.
  • Priority: Set how important the test is relative to others.
  • Tags: Add tags to make filtering and grouping easier across features, releases, or test cycles.

At this stage, you can also add attachments such as screenshots, design mockups, requirement documents, or sample data. 

Step 3: Define Preconditions and Test Data

Before writing test steps, document any preconditions that must be met for the test to run correctly. This could include user roles, account states, system configurations, or required data.

If the test depends on specific input values, credentials, or data sets, note them here as well. Clear preconditions help avoid confusion and make it easier to execute the test consistently across different environments.

Step 4: Write Test Steps and Expected Results

Next, add the actual test steps. Each step should describe a single action the tester needs to perform, written in the correct order.

For each step or for the test as a whole, define the expected result. This clearly states what should happen if the feature is working correctly and provides a reference point when comparing actual outcomes during execution.

Keeping steps short and precise makes the test case easier to follow and reduces the chance of misinterpretation.

Step 5: Review and Create the Test Case

Before saving, take a moment to review the test case:

  • Are the steps easy to follow?
  • Are the expected results clear?
  • Is all necessary context included?

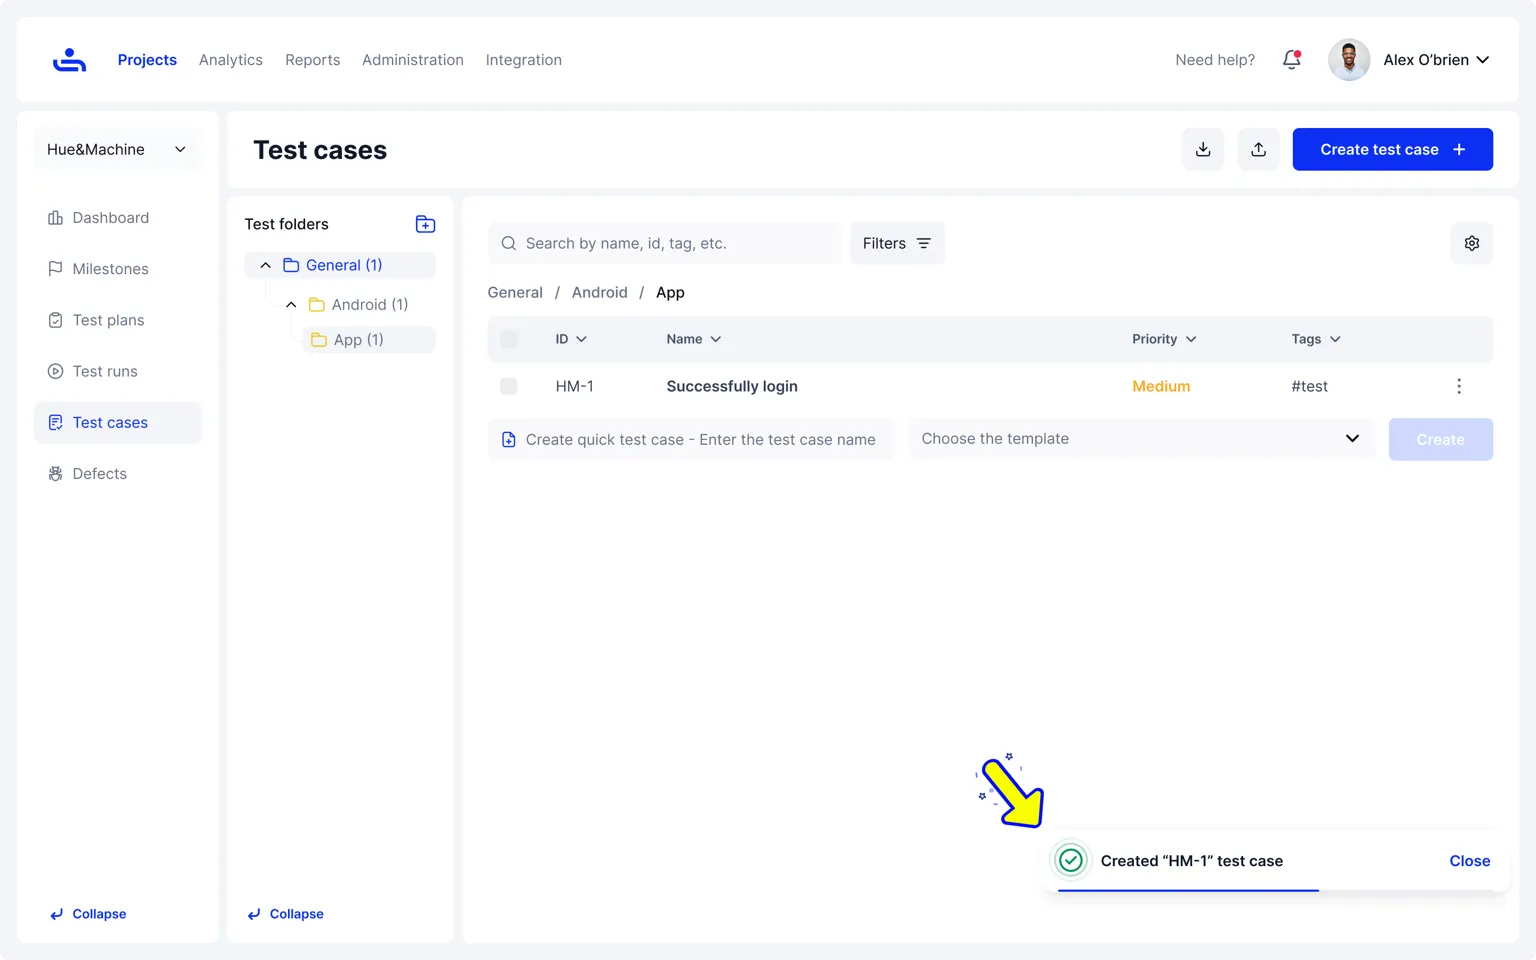
Once everything looks good, click Create. The test case is added to your test case repository, where it can be viewed, edited, reused, or included in test runs.

Once you hit Create, the new test case appears in your Once you hit Create, the new test case appears in your test case repository, along with a confirmation message. This repository is where all your test cases live, making it easy to browse, filter, and manage them as your suite grows. The process stays consistent whether you’re adding one test or building out an entire collection.

A dialogue box showing a newly written test case in TestFiesta.

Best Practices for Writing Effective Test Cases

Writing test cases might seem routine for experts, but it’s what keeps QA organized and dependable. A well-written case greatly saves time and reduces confusion, which means you can put more effort into other things that require brainpower. 

  • Use simple, precise language: Keep your test cases clear and straightforward so anyone on the QA team can follow them without confusion. Avoid jargon and focus on clarity to make execution faster and more accurate.
  • Keep test cases independent: Each test should be able to run on its own without depending on the results of another. 
  • Focus on one objective per test: Make sure every test case checks a single function or behavior. This helps identify problems quickly and keeps debugging simple when a test fails.
  • Regularly review and update: As the software changes, review and update your test cases so they still reflect current functionality
  • Reuse and modularize where possible: If multiple tests share similar steps, create reusable components or templates. This saves time, promotes consistency, and makes updates easier in the long run. TestFiesta also supports Shared Steps, allowing you to define common actions once and reuse them across any number of test cases. This saves time, promotes consistency, and makes updates easier in the long run.

Common Mistakes to Avoid When Writing Test Cases

Even experienced QA teams can make small mistakes that lead to unclear or incomplete test coverage. Here are some common pitfalls to watch out for:

  • Ambiguous steps: Writing unclear or vague instructions makes it hard for testers to follow the test correctly. Each step should be specific, action-based, and easy to understand. Example: “Check the login page” is vague. Instead, use “Enter a valid email and password, then click Login.”
  • Missing preconditions: Skipping necessary setup details can cause confusion and inconsistent results. Always list the environment, data, or conditions required before running the test. For example, forgetting to mention that a test user must already exist or that the tester needs to be logged in before starting. 
  • Combining multiple objectives: Testing too many things in one case makes it difficult to identify what went wrong when a test fails. Keep each test focused on a single goal or function. For instance, a single test that covers login, updating a profile, and logging out should be split into separate tests.
  • Ignoring edge and negative cases: It’s easy to focus on the happy path and miss out on negative scenarios. Testing edge cases helps catch hidden bugs and makes your software reliable in all situations. Example: Not testing invalid input, empty fields, extremely large values, or actions performed with a poor internet connection.

Using TestFiesta to Write Test Cases

Creating and maintaining test cases can often be time-consuming, but TestFiesta is designed to make the process easier and more efficient than other platforms. TestFiesta helps QA teams save time, stay organized, and focus on actual testing instead of repetitive setup or documentation work.

  • AI-Powered Test Case Creation: TestFiesta’s on-demand AI helps generate test cases automatically based on a short prompt or requirement. It minimizes manual effort and speeds up preparation, giving testers more time to focus on execution and analysis.
  • Shared Steps to Eliminate Duplication: Common steps, such as logging in or navigating to a page, can be created once and reused across dozens of test cases. Any updates made to a shared step reflect everywhere it’s used, helping maintain consistency and save hours of editing.
  • Flexible Organization With Tags and Custom Fields: TestFiesta lets QA teams organize test cases in a flexible way. You can use folders and custom fields for structure, while flexible tags make it easy to categorize, filter, and report on test cases dynamically. This tagging system gives you far more control and visibility than the rigid folder setups used in most other tools.
  • Detailed Customization and Attachments: Testers can attach files, add sample data, or include custom fields in each test case to keep all relevant details in one place. This makes every test clear, complete, and ready to execute.
  • Smooth, End-To-End Workflow: TestFiesta keeps every step streamlined and fast. You move from creation to execution without unnecessary clicks, giving teams a clear, efficient workflow that helps them stay focused on testing, not the tool.
  • Transparent, Flat-Rate Pricing: It’s just $10 per user per month, and that includes everything. No locked features, no tiered plans, no “Pro” upgrades, and no extra charges for essentials like customer support. Unlike other tools that hide key features behind paywalls, TestFiesta gives you the full product at one simple, upfront price.
  • Free User Accounts: Anyone can sign up for free and access every feature individually. It’s the easiest way to experience the platform solo without friction or restrictions.
  • Instant, Painless Migration: You can bring your entire TestRail setup into TestFiesta in under 3 minutes. All the important pieces come with you: test cases and steps, project structure, milestones, plans and suites, execution history, custom fields, configurations, tags, categories, attachments, and even your custom defect integrations. 
  • Intelligent Support That’s Always There: With TestFiesta, you’re never left guessing. Fiestanaut, our AI-powered co-pilot, helps with quick questions and guidance, and the support team steps in when you need a real person. Help is always within reach, so your work keeps moving.

Final Thoughts

Learning how to write a test case effectively is one of the most impactful ways to improve software quality. Clear, well-structured test cases help QA teams catch issues early, stay organized, and gain confidence in every release. Although good documentation is crucial to keep everyone on the same page, well-written test cases make testing smoother, faster, and more consistent. The time you invest in learning how to write a test case pays off through shorter testing cycles, quicker feedback, and stronger collaboration between QA and development teams. TestFiesta makes it even easier to write a test case and manage your testing process with AI-powered test case generation, shared steps, and flexible organization. 

FAQs

What is test case writing?

Test case writing is the process of creating step-by-step instructions that help testers validate if a specific feature of an application works correctly. A written test case includes what needs to be tested, how to test it, and what result to expect.  

How do I write test cases based on requirements?

To write test cases based on requirements, start by reading project requirements and user stories to have a better idea of what the feature needs to do. Identify main scenarios that need testing, both positive and negative ones. Write clear steps for each scenario, list any preconditions, and explain the expected result. Each test case should be mapped to a specific requirement to ensure full coverage and traceability.

How to write automation test cases?

Start by selecting test scenarios that are repetitive and time-consuming to run manually. Define clear steps, inputs, and expected results, then convert them into scripts using your chosen automation tool. Write your tests in a way that makes updates easy, avoid hard-coding values, keep steps focused on user actions (not UI details that may change), and structure them so they can be reused across similar features.

How to write a good test case?

A good test case is clear, focused, and easy to follow. It should have a defined objective, simple steps, accurate preconditions, and a clear expected result. Avoid ambiguity, keep one goal per test case, and make sure it can be repeated with the same outcome every time.

How to write a test case in manual testing?

To write a test case in manual testing, make notes that clearly explain what to test, how to test it, and what outcome is expected. Include any preconditions, such as login requirements or setup steps. Once executed, record the actual result and compare it with the expected result to determine whether the test passes or fails.

Tool

Pricing

TestFiesta

Free user accounts available; $10 per active user per month for teams

TestRail

Professional: $40 per seat per month

Enterprise: $76 per seat per month (billed annually)

Xray

Free trial; Standard: $10 per month for the first 10 users (price increases after 10 users)

Advanced: $12 per month for the first 10 users (price increases after 10 users)

Zephyr

Free trial; Standard: ~$10 per month for first 10 users (price increases after 10 users)

Advanced: ~$15 per month for the first 10 users (price increases after 10 users)

qTest

14‑day free trial; pricing requires demo & quote (no transparent pricing)

Qase

Free: $0/user/month (up to 3 users)

Startup: $24/user/month

Business: $30/user/month

Enterprise: custom pricing

TestMo

Team: $99/month for 10 users

Business: $329/month for 25 users

Enterprise: $549/month for 25 users

BrowserStack Test Management

Free plan available

Team: $149/month for 5 users

Team Pro: $249/month for 5 users

Team Ultimate: Contact sales

TestFLO

Annual subscription (specific amounts per user band), e.g., Up to 50 users: $1,186/yr; Up to 100 users: $2,767/yr; etc.

QA Touch

Free: $0 (very limited)

Startup: $5/user/month

Professional: $7/user/month

TestMonitor

Starter: $13/user/month

Professional: $20/user/month

Custom: custom pricing

Azure Test Plans

Pricing tied to Azure DevOps services (no specific rate given)

QMetry

14‑day free trial; custom quote pricing

PractiTest

Team: $54/user/month (minimum 5 users)

Corporate: custom pricing

Black Box Testing

White Box Testing

Coding Knowledge

No code knowledge needed

Requires understanding of code and internal structure

Focus

QA testers, end users, domain experts

Developers, technical testers

Performed By

High-level and strategic, outlining approach and objectives.

Detailed and specific, providing step-by-step instructions for execution.

Coverage

Functional coverage based on requirements

Code coverage

Defects type found

Functional issues, usability problems, interface defects

Logic errors, code inefficiencies, security vulnerabilities

Limitations

Cannot test internal logic or code paths

Time-consuming, requires technical expertise

Aspect

Test Plan

Test Case

Purpose

Defines the overall testing strategy, scope, and approach for a project or release.

Validates that a specific feature or functionality works as expected.

Scope

Covers the entire testing effort, including what will be tested, resources, timelines, and risks.

Focuses on a single scenario or functionality in the broader scope.

Level of Detail

High-level and strategic, outlining approach and objectives.

Detailed and specific, providing step-by-step instructions for execution.

Audience

Project managers, stakeholders, QA leads, and development teams.

QA testers and engineers.

When It's Created

Early in the project, before testing begins.

After the test plan is defined and the requirements are clear.

Content

Scope, objectives, strategy, resources, schedule, environment details, and risk management.

Test case ID, title, preconditions, test steps, expected results, and test data.

Frequency of Updates

Updated periodically as project scope or strategy changes.

Updated frequently as features change or bugs are fixed.

Outcome

Provides direction and clarifies what to test and how to approach it.

Produces pass or fail results that indicate whether specific functionality works correctly.

Tool

Key Highlights

Automation Support

Team Size

Pricing

Ideal For

TestFiesta

Flexible workflows, tags, custom fields, and AI copilot

Yes (integrations + API)

Small → Large

Free solo; $10/active user/mo

Flexible QA teams, budget‑friendly

TestRail

Structured test plans, strong analytics

Yes (wide integrations)

Mid → Large

~$40–$74/user/mo)

Medium/large QA teams

Xray

Jira‑native, manual/
automated/
BDD

Yes (CI/CD + Jira)

Small → Large

Starts ~$10/mo for 10 Jira users

Jira‑centric QA teams

Zephyr

Jira test execution & tracking

Yes

Small → Large

~$10/user/mo (Squad)

Agile Jira teams

qTest

Enterprise analytics, traceability

Yes (40+ integrations)

Mid → Large

Custom pricing

Large/distributed QA

Qase

Clean UI, automation integrations

Yes

Small → Mid

Free up to 3 users; ~$24/user/mo

Small–mid QA teams

TestMo

Unified manual + automated tests

Yes

Small → Mid

~$99/mo for 10 users

Agile cross‑functional QA

BrowserStack Test Management

AI test generation + reporting

Yes

Small → Enterprise

Free tier; starts ~$149/mo/5 users

Teams with automation + real device testing

TestFLO

Jira add‑on test planning

Yes (via Jira)

Mid → Large

Annual subscription starts at $1,100

Jira & enterprise teams

QA Touch

Built‑in bug tracking

Yes

Small → Mid

~$5–$7/user/mo

Budget-conscious teams

TestMonitor

Simple test/run management

Yes

Small → Mid

~$13–$20/user/mo

Basic QA teams

Azure Test Plans

Manual & exploratory testing

Yes (Azure DevOps)

Mid → Large

Depends on the Azure DevOps plan

Microsoft ecosystem teams

QMetry

Advanced traceability & compliance

Yes

Mid → Large

Not transparent (quote)

Large regulated QA

PractiTest

End‑to‑end traceability + dashboards

Yes

Mid → Large

~$54+/user/mo

Visibility & control focused QA

Related Articles

Introduction

Even if all your unit tests pass and your software is deployed, a user can still face problems with your service or payment gateways due to errors in the API response. Technically, there was nothing wrong with your product, but the failure was in the space between components. That space is what integration testing covers.

This ultimate integration testing guide walks through what integration testing is, how it works, and its main approaches, and gives you a practical integration testing workflow you can run in CI.

What Is Integration Testing

Integration testing is a form of software testing that checks that two or more components work correctly when combined. A component can be a class, a module, a service, a database, or a third-party API. The point is to test the handoff between each component in order to make sure that the connection works correctly.

Think of an online store where a unit test verifies that your “calculate total” function correctly adds up the prices of items in a cart. An integration test goes a step further. It verifies that once the total is calculated, your checkout service successfully passes that order information to the payment gateway and receives a “success” confirmation back. 

This test case ensures that your system components aren’t just working individually but are actually communicating and completing the transaction as expected.

What Does Integration Testing Actually Verify

Most integration bugs cluster around a small set of boundaries. A useful integration suite targets these directly:

  • Database connections and transaction boundaries. Integration testing verifies database connections and transaction boundaries, such as the ORM mapping matching the schema, rollbacks happening when a write fails halfway through, and migrations running cleanly against a fresh database.
  • REST and gRPC API request/response contracts. Integration testing for REST and gRPC API request/response contracts verifies that consumers send data that matches provider expectations, ensures that clients robustly handle empty nullable fields, and confirms that status codes and error bodies are properly managed.
  • Message broker event publishing and consumption. Integration testing at this boundary verifies that the producer serializes events in a format the consumer can deserialize and confirms how the system handles scenarios such as redelivery, ordering changes, or poison messages.
  • File system read/write operations. Integration testing for file system read/write operations verifies that path handling, encoding, permissions, and cleanup behave consistently across environments, ensuring that tests interacting with the actual disk catch issues that stub-based tests might miss.
  • External SaaS and third-party service adapters. Integration testing for external SaaS and third-party service adapters tests the APIs and services of payment providers, email, and auth providers. You rarely call the live service in a test, but you do need to verify your adapter handles its real response shapes, rate limits, and failure modes.

Types of Integration Testing

The classic integration testing strategies come from an era of monolithic systems with strict module hierarchies. They still apply, especially when you’re integrating a large codebase or replacing a legacy system piece by piece.

Big Bang Integration Testing

In big bang integration testing, all components are built, then integrated and tested at once. It’s simple to plan and requires no stubs or drivers. The drawback is obvious: when something fails, isolating the cause across dozens of simultaneously connected modules is slow. Big bang integration testing works for small systems with few components, but it’s not scalable.

Top-Down Integration Testing

In top-down integration testing, testing starts at the highest-level module and works downward. Lower-level modules that aren’t ready yet are replaced with stubs that return canned responses. This approach validates the main control flow early and lets you demo working features before the whole system exists. The cost is writing and maintaining stubs, and the lowest-level modules (often the ones handling data and I/O) get tested last.

Bottom-Up Integration Testing

Bottom-up integration testing is the reverse of top-down. Testing starts with the lowest-level modules and moves up. Higher-level modules that don’t exist yet are simulated with drivers that call the modules under test. Bottom-up integration testing surfaces problems in foundational components early, which is useful when the data layer is the riskiest part. The trade-off is that the top-level flow, the thing users actually see, is validated last.

Sandwich (Hybrid) Integration Testing

In sandwich or hybrid integration testing, top-down and bottom-up run in parallel and meet in the middle. Large teams use this to work on both ends simultaneously. It’s the most flexible approach and the most demanding. You need both stubs and drivers, and the middle layer where the two efforts converge is often the hardest to test properly.

In modern microservice environments, these categories often blur. You’re more likely to think in terms of which service boundary you’re testing than which direction you’re integrating. 

Where Integration Testing Fits in the Software Testing Pyramid

The testing pyramid puts many fast unit tests at the base, fewer integration tests in the middle, and a small number of end-to-end tests at the top. The shape reflects cost. Higher-level tests are slower to run, harder to maintain, and more likely to fail for reasons unrelated to the code under test.

Integration tests sit in the middle because they’re the best compromise. They catch real wiring bugs without the fragility of a full browser-driven flow.

Integration Testing vs Unit Testing

Unit testing focuses on isolated functions or classes using mocked or stubbed dependencies, typically running in milliseconds to catch specific logic errors that suggest the code itself is incorrect. In contrast, integration testing examines how two or more components interact by utilizing real dependencies like databases, APIs, or message brokers. This process is slower, taking seconds to minutes to run, and is specifically designed to identify contract and configuration errors, highlighting instances where individual components fail to fit together correctly.

Integration Testing vs End-to-End Testing

End-to-end (E2E) tests exercise a complete user journey through the real system: browser, frontend, backend, database, and everything in between. They’re the closest thing to a real user and the most expensive tests you’ll write. Integration tests are narrower. They test a specific seam, not the whole journey. A checkout E2E test would log in, add an item, enter payment details, and confirm the order. The equivalent integration tests would separately verify that the cart service talks to inventory, that the order service talks to payment, and that the confirmation event reaches the email service.

What Is System Integration Testing (SIT)

System integration testing is integration testing at the level of whole systems rather than modules. Instead of checking that two classes work together, SIT checks that your application works with the other systems it depends on: an ERP, a payment processor, a partner’s API, and a data warehouse. 

SIT typically happens after each system has passed its own internal testing and before user acceptance testing. It’s common in enterprise environments where multiple vendors or teams own different pieces, and none of them can see the full picture alone.

How to Run Integration Tests: Workflow and Best Practices

A repeatable workflow keeps integration tests focused and maintainable. Here’s one that works:

1. Identify the boundary under test

The first step is to identify the boundary under test. Be specific. “Test the order service” is too broad. “Test that the order service correctly persists an order and publishes an OrderCreated event” is a valid boundary. Every integration test should be able to name the seam it’s covering.

2. Define your scenarios

For each boundary, list the happy path and the failure modes that matter. What happens when the database is unavailable, when the API returns a 500, or when the event payload is missing a required field? Failure scenarios are where integration tests earn their keep. Skipping them turns the suite into a smoke test.

3. Choose your test doubles

Decide what’s real and what’s faked. A common pattern is:

  • Real: your own database (in a container), your own services
  • Faked: third-party APIs, payment providers, anything with rate limits or cost

The rule of thumb is to keep real anything you own and control, and fake anything you don’t. Fakes for external services should be based on recorded real responses, not guesses.

3. Implement using Arrange-Act-Assert-Teardown

To implement, arrange the state (seed the database, start the container, configure the mock), act by calling the code under test, assert on the outcome, including side effects like database rows or published events, and tear down so the next test starts clean. Teardown is the step teams skip, and it’s the source of most flaky integration suites. If test A leaves a row behind and test B assumes an empty table, you get failures that depend on execution order.

4. Run in CI

Integration tests belong in the pipeline, not on someone’s laptop. Run them on every pull request if they’re fast enough, or on merge to main if they’re not. Spin up fresh infrastructure for each run rather than sharing a long-lived test database.

5. Triage and report

An integration failure needs to answer three questions fast: which boundary, which scenario, and what changed. Structured test names and clear assertion messages help. So does tracking results over time, so you can distinguish a new regression from a flaky test that's been flaky for weeks and nobody has fixed.

What Is Automated Integration Testing

Automated integration testing means the tests run without human intervention as part of your build. The code, the infrastructure setup, the execution, and the reporting are all scripted. The alternative, manual integration testing, still has a place for exploratory work and for one-off SIT cycles. But for anything that needs to run repeatedly, automation is the only option that scales.

Automated integration testing, while necessary for repetitive runs, fails in predictable ways, sich as:

  • Overly broad test scope. A test that exercises five services at once is an E2E test in disguise. When it fails, you’re back to guessing.
  • Shared mutable state between tests. Tests that read or write the same rows, files, or queues without isolation will pass alone and fail together.
  • Hard-coded timeouts that pass locally and fail in CI. Your laptop starts a container in two seconds. The CI runner takes eight. Poll for readiness instead of sleeping for a fixed duration.
  • Brittle assertions on non-deterministic data. Timestamps, auto-generated IDs, and ordering of unordered collections will vary. Assert on what matters, not on exact output.

Integration Testing Tools Worth Knowing in 2026

Integration testing doesn’t have a single dominant tool. Here’s what your stack needs to contain: You assemble a stack: a test harness to run tests, infrastructure tooling to provide real dependencies, mocking tools for external services, contract testing for API boundaries, and a test management layer to keep track of it all.

Test Harnesses

A test harness is necessary to run tests. Good tool options are:

  • JUnit 5. The default for JVM projects. Its extension model supports lifecycle hooks for starting and stopping infrastructure around test classes.
  • pytest. The standard for Python. Fixtures with configurable scope make it straightforward to share a database connection across a test module and tear it down afterward.
  • Jest. Widely used for JavaScript and TypeScript. Works for integration tests against Node services, though you’ll typically pair it with a separate tool for infrastructure.

Infrastructure & Mocking

Infrastructure and mocking help provide real dependencies.

  • Testcontainers. Spins up real databases, message brokers, and other services in Docker containers from within your test code, then tears them down. Available for Java, Go, .NET, Python, Node, and others. It’s become the standard answer to “how do I test against a real Postgres without a shared test database?”
  • WireMock / Hoverfly. Both simulate HTTP APIs. WireMock lets you define stubbed endpoints with request matching and response templating. Hoverfly can capture real traffic and replay it, which is useful for building fakes of third-party APIs from actual responses.
  • Postman / Newman. Postman collections define API requests and assertions. Newman runs those collections from the command line, so the same checks you built interactively can run in CI.

Contract Testing

Contract testing is a specialized form of integration testing where the consumer and provider each verify against a shared contract rather than testing against each other directly. It’s particularly useful for microservices owned by different teams.

  • Pact. Good for consumer-driven contract testing. The consumer defines what it expects, generates a contract file, and the provider verifies it can meet that contract. Supports multiple languages through a shared core.
  • Spring Cloud Contract. Good for contract testing for JVM services in the Spring ecosystem. Contracts are written in Groovy or YAML and generate both provider-side tests and consumer-side stubs.

Test Management

A test management layer is necessary to keep track of everything you will do in the steps above.

TestFiesta. TestFiesta is a test management platform that helps track which integration scenarios exist, which boundaries are covered, what’s passing over time, and which failures have already been filed as bugs. In addition to supporting your integration testing, it can cover all the test cases in your entire testing pyramid, helping you build reliable, scalable products.

Managing integration tests shouldn’t be a hurdle.

With TestFiesta, you can track your test scenarios, monitor boundary coverage, and surface regression risks in one place.

Start a free trial today

FAQs

Is integration testing the same as API testing?

No, integration testing is not the same as API testing, though they overlap. API testing verifies that an API behaves according to its specification. Integration testing verifies that components work together, and one of those components might be an API. 

Can integration tests replace end-to-end tests entirely?

Not entirely. Integration tests verify that each boundary works. E2E tests verify that the whole journey works, including the frontend and things like session handling that integration tests don’t touch. A good suite has many integration tests and a small number of E2E tests covering the critical paths. Eliminating E2E completely means something important will remain untested.

How many integration tests should a healthy test suite have?

There’s no fixed number for integration tests in a suite. The testing pyramid suggests that integration tests should be fewer than unit tests and more than E2E tests, but the right count depends on how many boundaries your system has and how risky each one is. 

What’s the difference between integration testing and UAT?

Integration testing checks that the system’s components work together technically. User acceptance testing (UAT) checks that the system does what the business needs, usually performed by end users or business stakeholders against realistic scenarios. 

Best practices
Testing guide

Introduction

Most problems that occur during development aren’t related to development at all. They’re mostly about the process around it. The software development life cycle is a process that deals with and prevents the failures associated with shifting requirements, late testing, or post-launch workload. 

In this guide, we’ll talk about the seven phases of the software development life cycle, compare the different life cycle models, discuss what a real agile sprint looks like in development, and give you a practical framework for picking the right approach for your project.

What Is the Software Development Life Cycle (SDLC)

Every piece of software you use, from your banking app to the platform you’re reading this on, went through some version of the same journey: someone planned it, designed it, built it, tested it, shipped it, and now keeps it running. The software development life cycle (SDLC) is the name for that journey.

More formally, the SDLC is a structured process that takes software from an initial idea to a live, maintained product. It breaks development into distinct phases, each with its own goals and deliverables, so teams know what they’re doing, why they’re doing it, and what “done” looks like at every step.

Why the Software Development Life Cycle Is Important

Software projects fail far more often from process problems than from technical ones, such as requirements that were never pinned down, testing squeezed into the last two weeks, or no after-launch plan. The SDLC exists to prevent exactly these kinds of failures. It gives teams a shared map, and a shared map means fewer surprises, less rework, and software that actually does what it was supposed to do.

A key thing to remember here is that the SDLC is not paperwork for its own sake. A three-person startup and a 300-person enterprise team both follow a life cycle, whether they formally name it or not. The only question is whether they follow it deliberately or by accident, and a deliberate approach is cheaper and more effective every single time.

The software development life cycle is different from the software testing life cycle, which mostly deals with the testing process.

The Phases of the Software Development Life Cycle (SDLC)

SDLC usually has seven phases that help development teams plan the entire development and post-launch steps for their product. These phases are

The seven phases of the software development life cycle (SDLC)

1. Planning

Planning includes defining the scope, goals, timeline, budget, and stakeholder requirements. This is the foundation everything else is built on, and weak planning shows up as problems in every phase that follows.

2. Feasibility Analysis

Feasibility analysis helps teams confirm that the project is actually viable and has practical benefit before anyone writes a line of code. A couple of key questions to ask are: Can the product be built with the technology and team you have, and does the budget hold up? If the answer is no, it’s time to redo your project foundation.

3. System Design

System design helps translate requirements into architecture. This is where you choose the tech stack, map out the database schema, design the UI/UX, and define how APIs will talk to each other.

4. Implementation (Coding)

Developers write the actual code based on the design specs. This is typically the longest phase because it involves building the entire product. It’s the phase most people picture when they think of software development. 

5. Testing

Testing is the process of verifying and validating that the software works. It catches bugs in the software and confirms that everything meets the requirements. Unit tests check individual components, integration tests check how they work together, and system tests check the product as a whole. Together, these tests make a testing pyramid that most testing teams follow.

6. Deployment

Deployment involves releasing the software to users. Most teams do this in stages: a beta for early adopters, a limited rollout, then a full launch once things look stable. But there’s no hard-and-fast rule for deployment. 

7. Maintenance

Deployment is not the end of the process. Ongoing support is necessary to fix bugs that show up in production, monitor performance and conduct regular performance testing, patch security issues, and develop new features. Healthy software spends most of its life in this phase.

The Most Common SDLC Models and When to Use Each

Nearly every team goes through the same SLDC phases, but not every team goes through them the same way. Some move in a straight line, phase by phase. Others loop through all of them every two weeks. How teams move through the phases is defined by the model they’re using to build software. Choosing the right model for your project matters just as much as following the process itself. Here are the most common models teams follow:

1. Waterfall: Structure-Oriented 

Waterfall is the original SDLC model, and it works exactly like it sounds. You complete one phase fully, sign it off, and move to the next. Requirements first, then design, then coding, then testing, then release. No going back upstream.

That rigidity gets Waterfall a bad reputation, but it’s genuinely the right choice for some projects. If your scope is fixed, your requirements are stable, and your stakeholders know exactly what they want (think government contracts, regulated industries, or hardware-adjacent software), the phase-by-phase discipline is a strength. Everything is documented, everyone knows the plan, and there’s a clear audit trail.

The limitation is just as clear. If requirements change mid-project, Waterfall has no good answer. Changes discovered during testing mean going back to designs that were signed off months ago, and that gets expensive fast.

2. Agile: Iterative Approach 

Agile flips the Waterfall logic. Instead of running each phase once over many months, Agile teams run all of them in short, repeated cycles called sprints. Plan a small slice of the product, design it, build it, test it, show it to stakeholders, gather feedback, then start the next cycle with that feedback baked in.

A common misconception is that Agile replaces the SDLC phases. That’s not true. Agile doesn’t replace SDLC. It compresses and repeats them. You still plan, design, build, and test. You just do it iteratively instead of once per project.

The two most popular Agile frameworks are Scrum, which organizes work into fixed-length sprints with defined roles and ceremonies, and Kanban, which focuses on continuous flow and limiting work in progress. Both are built on the same principle: short feedback loops that beat long-range guesses.

Agile is the best fit for large, complex, or evolving projects where requirements will shift and where clients or end users are available to give regular feedback.

3. DevOps: Development Meets Operations

DevOps often gets listed alongside Waterfall and Agile as if it were another SDLC model. It isn’t, really. DevOps is a set of practices and a culture that layers on top of your existing model, usually Agile. 

The core idea is breaking down the wall between the people who build software and the people who run it in production. In traditional setups, developers throw code over that wall and operations catch whatever lands. DevOps merges the two through automation: continuous integration (CI) automatically builds and tests every code change, and continuous delivery (CD) gets those changes into production quickly and safely.

If your team needs fast, frequent releases and can invest in automated pipelines, DevOps practices are close to non-negotiable. Teams shipping weekly or daily simply cannot rely on manual builds and manual deployments.

How to Pick the Right SDLC Model for Your Project

The right approach to picking the right SDLC model for your project is to ask a few questions before committing. These questions are:

  1. Are your requirements fixed, or likely to evolve? Fixed requirements tolerate a linear model. Evolving requirements demand iteration.
  2. How involved will the client or end users be during development? Agile only works if someone is actually available to give feedback every sprint.
  3. How experienced is your team with iterative vs. structured approaches? A team that’s never run a sprint will stumble through its first few. That’s fine, but plan for it.
  4. What’s your risk tolerance? In other words, how costly would a late-stage change be? The more expensive a late surprise, the more you should invest in upfront analysis or frequent checkpoints.
  5. Do you need continuous deployment, or is a single release acceptable? A one-and-done launch and a ship-every-week product need very different pipelines.

The answers will give you a clear hint about what model you should choose. If you’re genuinely torn between two models, start with the one that gives you feedback sooner. You can always add structure to an iterative process. 

How TestFiesta Fits Into Every Phase of Your SDLC

Most teams handle planning and implementation just fine. It’s testing where structure quietly falls apart: cases scattered across spreadsheets, test runs nobody can trace, and results that never make it back to the people planning the next release. TestFiesta gives your QA process the same structure the rest of your SDLC already has, with organized test cases, clear runs, and results your whole team can actually act on.

Ready to bring order to your testing workflow?

Try TestFiesta today and turn scattered spreadsheets into structured test cases, traceable runs, and actionable insights for your team.

Start your free trial today

FAQs

What’s the difference between SDLC and Agile?

SDLC is a process that manages your entire software development project, and agile is one of the models you can follow to manage that process. They’re not competing concepts, even though it’s a common misconception. The SDLC is the overall process: the phases every software project moves through, from planning to maintenance. Agile is one model for moving through those phases. Agile doesn’t replace SDLC. It runs the phases in short, repeated cycles rather than a single long sequence. 

How long does each phase of the SDLC take?

There’s no universal timeline for how long each SDLC phase will take. The time depends on project size, team, and model. In rough proportions, implementation takes the most time, followed by testing and then planning and design, whereas maintenance is an outlier that takes the most time after the product is deployed. In Agile, these proportions play out inside every sprint rather than across the whole project.

Can a team use more than one SDLC model on the same project?

Yes, teams do use more than one SDLC model on the same project, and it’s more common than most SDLC experts admit. Hybrid approaches work well when different parts of a project have different needs. A team might use Waterfall-style upfront planning for a component with fixed regulatory requirements, then run Agile sprints for the user-facing features that need iteration and feedback. Some organizations informally call this approach “Wagile” or “Water-Scrum-Fall.”

Best practices

Introduction

Unit tests are one of the most common types of tests in software testing. Unit testing is often treated as a checkbox activity: write the code, add some tests, hit 80% coverage, and call it a day. But if your tests are weak, slow, or fail to catch bugs before they reach production, you are not reaping the benefits of unit tests in practice. In this guide, we look at what unit testing really means in modern development, what a “unit” actually refers to, the AAA pattern of writing unit tests, and five common misconceptions that cause fragile test suites.

What Is a Unit Test in Software Development

A unit test is a piece of code that calls a small, isolated piece of application code, usually a function, method, or class, and verifies that it behaves correctly for a specific input and condition. It runs in milliseconds, needs no external systems (no database, no network, no filesystem), and produces the same pass or fail result every single time.

Unit tests are isolated, which means a unit test doesn’t check how two components work together (that happens in an integration test). A unit test checks one unit of behavior, under controlled conditions, with external dependencies either removed or replaced with stand-ins. Both unit tests and integration tests are part of the testing pyramid.

To make it clearer, think of testing as a circuit board. You test each component on its own before assembling the board. If a component works alone but the assembled board fails, you have an assembly problem, not a component problem. Unit tests give you that same certainty: when one fails, you know exactly which piece broke.

What Exactly Is a “Unit” in Testing

The word “unit” has no fixed definition in testing literature. That ambiguity is intentional. Here’s what experts consider unit in different circumstances:

  • In procedural programming, a unit is typically a single function.
  • In object-oriented programming, a unit is commonly a class or a tightly related cluster of classes.
  • In practice, a unit is whatever your team decides makes sense to test in isolation, such as a single method, a class, or a small module. The definition matters less than the consistency.

How to Write a Good Unit Test: The AAA Pattern and What Comes After

Every well-written unit test follows the same three-part structure, usually called Arrange-Act-Assert (AAA). The pattern is simple, but what makes a good unit test is the discipline of keeping each part honest.

Arrange: Set Up the Conditions

Create the object under test, prepare the inputs, and configure any test doubles. Keep this section as minimal as possible. Only the setup that’s directly relevant to this specific test case belongs here. 

A useful design signal is that if the arrange section is longer than the act and assert sections combined, the unit under test probably has too many dependencies. That means there is a problem with the design, not with the unit.

Act: Execute the Behavior

In this stage, call the function or method being tested. In the vast majority of cases, this should be a single line. If invoking the behavior takes multiple lines, the API is probably too complex. One test should have one act. If you’re testing two behaviors, write two tests. Combined tests produce combined failures, and combined failures take twice as long to diagnose.

Assert: Verify the Outcome

Check that the output or state change matches what you expected. Aim for one logical assertion per test. That doesn’t necessarily mean one assert statement; it means one logical thing being verified. Asserting three properties of the same returned object is fine. Asserting five unrelated behaviors is not. A test that checks five unrelated things tells you something failed, but not exactly what. A test with one logical assertion produces a failure message that diagnoses itself.

A Secret Tip: Verify That the Test Can Fail

Before you call a unit test done, confirm it actually catches the bug it’s designed to catch. Comment out or stub the production logic and run the test. If it still passes, it’s not testing what you think it is. This takes 30 seconds and catches a surprisingly common class of test: one that executes the code without validating the behavior. These tests inflate coverage numbers while providing zero quality signal, and they’re invisible until the day the code they “cover” breaks in production with every test still green.

5 Unit Testing Myths That Produce Bad Test Suites

Most bad test suites are written due to the five misconceptions that do the most damage.

Myth 1: 100% coverage means the code is tested. Coverage measures execution, not verification. A test that calls every function without meaningful assertions produces 100% statement coverage and zero quality signal. Treat coverage as a floor, not a ceiling: below 70 to 80% branch coverage on core logic is a red flag, but hitting 100% proves nothing on its own. 

Myth 2: You have to mock everything to isolate the unit. Over-mocking creates tests that are tightly coupled to implementation details. Refactor the internals without changing the behavior, and the tests break anyway, which trains developers to distrust and eventually ignore them. Tests should verify what the code does, not how it does it. Use real internal collaborators when they’re fast and deterministic. Reserve mocks for architectural boundaries: the database, the network, the clock, the filesystem.

Myth 3: Unit tests replace integration tests. Unit tests verify that each piece works in isolation. Integration tests verify that the pieces work together. A codebase with 100% unit coverage and zero integration tests has no guarantee that its database queries return what the code expects, that its API calls handle real responses, or that its services actually talk to each other. Both are necessary. Neither replaces the other.

Myth 4: Slow tests are fine if they’re thorough. A unit test suite that takes more than a couple of minutes to run is a waste of time and context, so developers start avoiding running it in the first place. When it doesn’t run, it doesn’t catch the bugs. The entire value of unit testing lives in the feedback loop: run tests after every change and catch bugs while the context is still in your head. That loop only works when tests are fast enough to run constantly. If your unit tests are slow, there’s something wrong with them.

Myth 5: Every line of code needs a unit test. Unit tests shine on pure logic, functions with deterministic outputs. Code that’s primarily I/O, such as database writes, HTTP calls, file operations, and UI rendering, is better covered by integration and end-to-end tests (the other two testing types in the testing pyramid). Forcing unit tests onto I/O-heavy code produces brittle mocking setups that shatter on every refactor. 

TestFiesta Simplifies Test Management for Your Entire Unit Test Suite

Unit tests generate the most granular quality signal in software development, and that signal dies in a terminal window. It lives in a developer’s local output, a CI log, or a coverage report that nobody outside engineering ever opens.

So when the QA lead asks if they’re ready to ship, you can’t hand them a Jest summary or a pytest report. What you need is a visible, trackable, and actionable insight. 

TestFiesta is a test management platform that closes that gap. It takes the signal your unit tests already generate and makes it visible, trackable, and actionable at the team level with structured test case organization, pass/fail tracking across CI runs, coverage visibility for stakeholders who don’t read terminal output, and an audit trail that turns “the unit tests passed” into a release readiness statement the whole team can stand behind.

Ready to turn your unit tests into a source of truth?

Stop burying your test quality in terminal logs. TestFiesta helps you organize, track, and report on your unit test suite, giving your entire team the visibility they need to ship with confidence.

Start your free trial today

FAQs

What’s the difference between a unit test and an integration test?

A unit test verifies a single piece of code in complete isolation, with no database, network, or external services involved. It runs in milliseconds and pinpoints exactly which function failed. An integration test verifies that multiple components work correctly together, using real databases, real API calls, and real service interactions. Learn the difference between unit tests and integration tests in the testing pyramid blog.

Should unit tests be written before or after the code?

Unit tests can be written before or after the code. But writing tests first (Test-Driven Development) is favored more by the experts. Case studies at Microsoft and IBM found teams practicing TDD shipped with 40 to 90% lower pre-release defect density than comparable teams that didn’t, at the cost of moderately longer development time. 

How many unit tests should a codebase have?

There’s no universal number for tests to be in a codebase. The right metric is branch coverage on business-critical code. A reasonable target for most production codebases is 70 to 80% branch coverage on core business logic, with lower thresholds acceptable for UI rendering, configuration, and I/O orchestration layers.

Best practices
Testing guide

Ready for a Platform that Works

The Way You Do?

Stop fighting your tools. Start shipping with confidence. TestFiesta adapts to your workflow, not the other way around.

Welcome to the fiesta!